30.10.08

Water Ripple

I want to experiment a little more with Angelina, and want to recreate the reflective qualities of water.

Peacock colours fibres, pale blue, dark blue and silver Angelina fibres were laid between two sheets of Baking paper. A quick pass over with a coolish iron to bond and voila, reflective shimming “fabric” ready for cutting.
In the past I have had difficulty getting the Angelina to stay, so I gluestiked it down, instead of using fusible webbing. The less amount of heat to Angelina the better.

I draw a ripple design onto A5 paper and cut the Angelina “fabric” to fit the ripples. Smoke monofilament threat straight stitched the Angelina onto a mottled blue/gray fabric scrap.

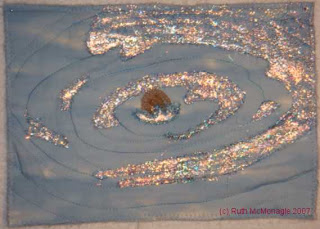
Some silver “hologram” fabric became the splash and a scrap of brown fabric, the rock. Free Motion Embroidery using “Lana Wool” thread to give the rock definition, and then blue variegated thread around the edge of the splash and the Angelina highlights.

Not quite the big splash I was wanting. Perhaps a lone planet in a solar system of it’s own. What do you think?

23.10.08

Kowhai

Following the Springtime theme, I want to bead collage a Kowhai. Printed a sketch of kowhai flower and a separate leaf and traced onto tissue paper.
Green thread outlined the leaves. Yellow silk thread outlined the Kowhai.
Zigzagged the stamens. Perhaps yellow beads will finish the stamen ends.
Created the green/brown top of the kowhai with a scrap of fabric and with double sided Vilene, ironed to the flower top and branch. Buttonhole stitched the edges. I wonder if I will ever stop this habit and just let the edges be raw.

Visited local store “Bead me up” and got a collection of yellow beads in different sized to fill in the Kowhai. Randomly I threaded up to six beads at t time, and laid them inside the Kowhai outline. Couching held the line of beads in place.
Bead soup or collage is heavy and creates texture and colour. After all the large beads had been used, I filled in any holes with smaller yellow beads. This was fun and I enjoyed this much more than couching the larger beads.

Not sure if I would use “bead soup” again. Maybe as rocks in a stream. I am pleased how the fabric scrap on the top of the flower suggests curves and a rounded shape, like the Kowhai.

18.10.08

Flamingo Tree

Inspired by Japanese fabric artist Noriko Endo, and the use of small slivers of fabric, overlaid with soft net. Especially effective on the quilt “Nature in NZ”, mosses, branches and the sun shining through.
This week I am going to try this technique with pink fabric and create a flamingo tree, the pink leaves are all abundant at the moment, and this may be perfect for the spiky leaves, instead of trying to appliqué individually or maybe cut-out the one large “leaf shape”.
Selected a bright pink fabric with a little gold thread embossed on it. Using the rotary cutter, slivers and triangles of fabric were cut, but this was difficult so ended up using the scissors, and cut the pieces approx 10- 20 mm long by 3-7 mm wide.
On a blue background fabric, pencil outlined the shape of the leaves and vlioflexed the brown trunk on. Machine embroider to create a dark and light side of the tree and outline some of the pattern of the brown fabric, as it reminded me of the bark on the flamingo tree.
I just threw the pink slivers onto the fabric base, and then arranged them until the impression of the leaves were created. I overlaid a fine white tulle, and pined it on place. Using a needle, I “teased” and moved the slivers more, to create sky between the leaves. Having the tulle on top really helped this process.
Monofilament grey thread and zigzagged around the leaves, and then straight stitch in a leafy motion to hold them all down.
Burgundy thread to create more dark on the trunk, and then pale beige to create more light. I should have removed the tearaway stabiliser on the back, as the quilt is quite stiff now.
Hand embroidered more burgundy on the twigs to give them a bit more life.
Perhaps I should have put some glue stik onto the background before throwing on the leaf slivers, to hold them into place.

9.10.08

Cherry Blossom - Felt

Decided to make some felt in Spring colours. Pink for Camellias and yellow for Kowhai.
I had only read about making felt, so decided to give it ago.
Bubble wrap, tulle, broomstick handle, plastic rubbing tray, Lux soap flakes, warm water and Sunlight soap.
Wasn’t sure which way to put the bubble wrap, so put it bubble side down. Spread out the merino wool in two layers, then my favourite part, put in the embellishments, silk threads, organza ribbon, plus other threads on top. Sprinkle with soap flakes, and laid the tulle over the top.
Poured warm water and began to rub with the plastic tray. Used too much water to begin with and it was sloppy. I removed the tulle, and rolled up the bubble wrap around the broom handle. Securing it with rubber bands is essential.
Roll, and roll and roll, backwards and forwards for a long time, at least a hundred rolls. My arms were sore.
After removing the felt from the bubble wrap, I rubbed some Sunlight soap into it, and manipulated it more by handling it, dropping, scrunching it for several more minutes. I think this is what is called “shocking the felt”, as it shrinks quite significantly.
I rinsed it well and waited for it to dry.

Printed off a cherry blossom sketch, and traced this onto tissue paper. After trying several layers of tulle, decided 3 layers of white tulle were sufficient, and pinned this under the blossom pattern. Pinned the tissue to the felt and sewed it on, using brown variegated thread for branches and background buds. Changed to white thread for the blossom. Removing the tissue paper wasn’t as bad as Press n Seal, but still needed to use tweezers to get some tiny amounts of paper off.
Unfortunately I used my drawing pencil, so the white thread had rubbed and turned grey, so had to wash the blossom. Will know better next time.
Cutting away the leftover tulle needed small sharp scissors. I like the softened effect the tulle gave. Free motion zigzagged in white thread “the branches”. Maybe brown might have been more effective?
Green thread echo quilted the blossom. I like how it radiates out from the cherry blossom.
Yellow beads were sewn in the cherry blossom for the stamen.

2.10.08

Red Canyon, Glenwood Springs, Colorado

While in the USA for several weeks, I worked on a small hand stitched piece. It was the view from one of the motels I stayed in Glenwood Springs, Colorado. The local quilt shop had some fabric that just matched the colour of the hills, and so I started.

Had to needle turn the hill cut outs, then tried cretan stitch and buttonhole stitch to create ridges and valleys.


A running thread using a varigated copper coloured thread, I tried to recreate the rock layers or strata. I als wanted to show the variants in the levels due to earth movement over the millions of years.


In Cortez, we had the most amazing thunderstorms in the afternoon, and lightning lit the skys. In Alburqueque, the evenings were spent spotting the lighting again, so I had to put this in the quilt. I had some blue crochet cotton, so running stitch to create the cloud and wind movement. By separating out the white dye section, feather stitched the lightning.


Lying next the pool in Kingman, AZ, had an hour to do some needlework, so worked on the lower hill using feather stitch, daisy chain flowers. The Van Dyke created "trees".


I couldn't remember how to do French Knots, so had to wait until I got back to NZ. Of course, that is where it lay, until I fished it out, looked up how to do french knots and finished it.


Everytime my wee boy sees this quilt he tells me he wants to go back to America, and just to see the lightning storms.