Christmas is upon us, so something Christmassy. The Pohutukawa symbolises NZ Christmas for me.
Textile inked some calico in different strengths of green.
Pohutukawa flowers. Drew 6cm and 4 cm circles on wash away stabiliser. Put the stabiliser in an embroidery hoop. Using red variegated crochet cotton in the bobbin, I sewed straight stitch from edge to edge, 1oclock to 7 o’clock, to 2 o’clock to 8 o’clock, etc, making sure I met and crossed in the centre.
Changed the tread to normal cotton and did none more large flower, then zigzagged 30 gauged beading wire to the flowers, about 8 times, making sure the thread is touching other thread.
I also just sewed 4 lengths of beading wire with zigzag stitch over the beading wire. Cur all the threads on the outside of the circle and washed it all away.
Leaves – painted Lutradur (sp) with textile ink, and then rubbed some Shiva paint sticks over when it was dry. I cut heaps of leaf shapes.
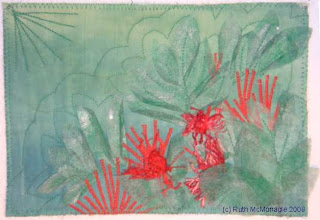 Onto the green fabric I zigzagged some red flowers, then stitched the leaves into place. I folded some over to give a 3D effect. Stitched some more red flowers and added more leaves.
Hand stitched the “wash away” flowers to the stitched one and manipulated the wire.
Unfortunately the picture doesn’t do this piece justice, but it is so 3D you expect bees and flies to land on the flowers.
Perhaps the quilt could benefit with brown stalks or yellow beads on the tip of the sewn down flowers.


